Kate Tarling

  • Home
  • Gallery
  • Commissions
  • About
  • Latest
  • Shop

Stitching a portrait - in stages....

June 28, 2017 by Kate Tarling

I have so much fun stitching people and their pets and turning them into mini embroideries. Each one is a fresh challenge and a chance to try and capture a moment in a person's life with thread and fabric.

I think of them as a cross between Victorian silhouette portraits and medieval embroidery. There's that same mix of depicting subjects with slow, steady workmanship.

When I first starting making my portraits I didn't intend to make them exact copies of people or animals. I stitched them with the aim of capturing a likeness of mood or personality. I just wanted them to represent a person or a pet by embroidering their features and hairstyle in quite a simple fashion.

But of course, like most things, the more you do the better you get. I haven't quite reached my "10,000 hours of practice to become an expert', if that much touted theory is to be believed, but I have now embroidered about 100 people and pets and so of course my technique has been honed and I like to think that I can capture a good likeness, simply through the application of a few (well a lot) of stitches!

I start with a photograph. It doesn't have to be anything special - just a snap from a phone is fine, as long as it's fairly clear and sharp. I can do portraits from any angle and if I'm doing a family set, I think they look better if there are different profiles. It makes the end framed picture look more dynamic.

I do a drawing from the photograph which I then re-size to the right proportions. To date, my portraits have all been about 9cm x 7cm. This is because they're all hand embroidered and this size works well with my style of stitching. However I am currently experimenting with larger sized portraits by incorporating paint and different threads, but more of that later.....

Once the design is complete and to size I do a very light tracing onto the background canvas. It's not a complete tracing as I don't like the marks on the material. I just use the dot technique to give me pointers for the first set of stitches. 

Here are some pictures which show the gradual growth of a portrait. 


IMG_1722.JPG

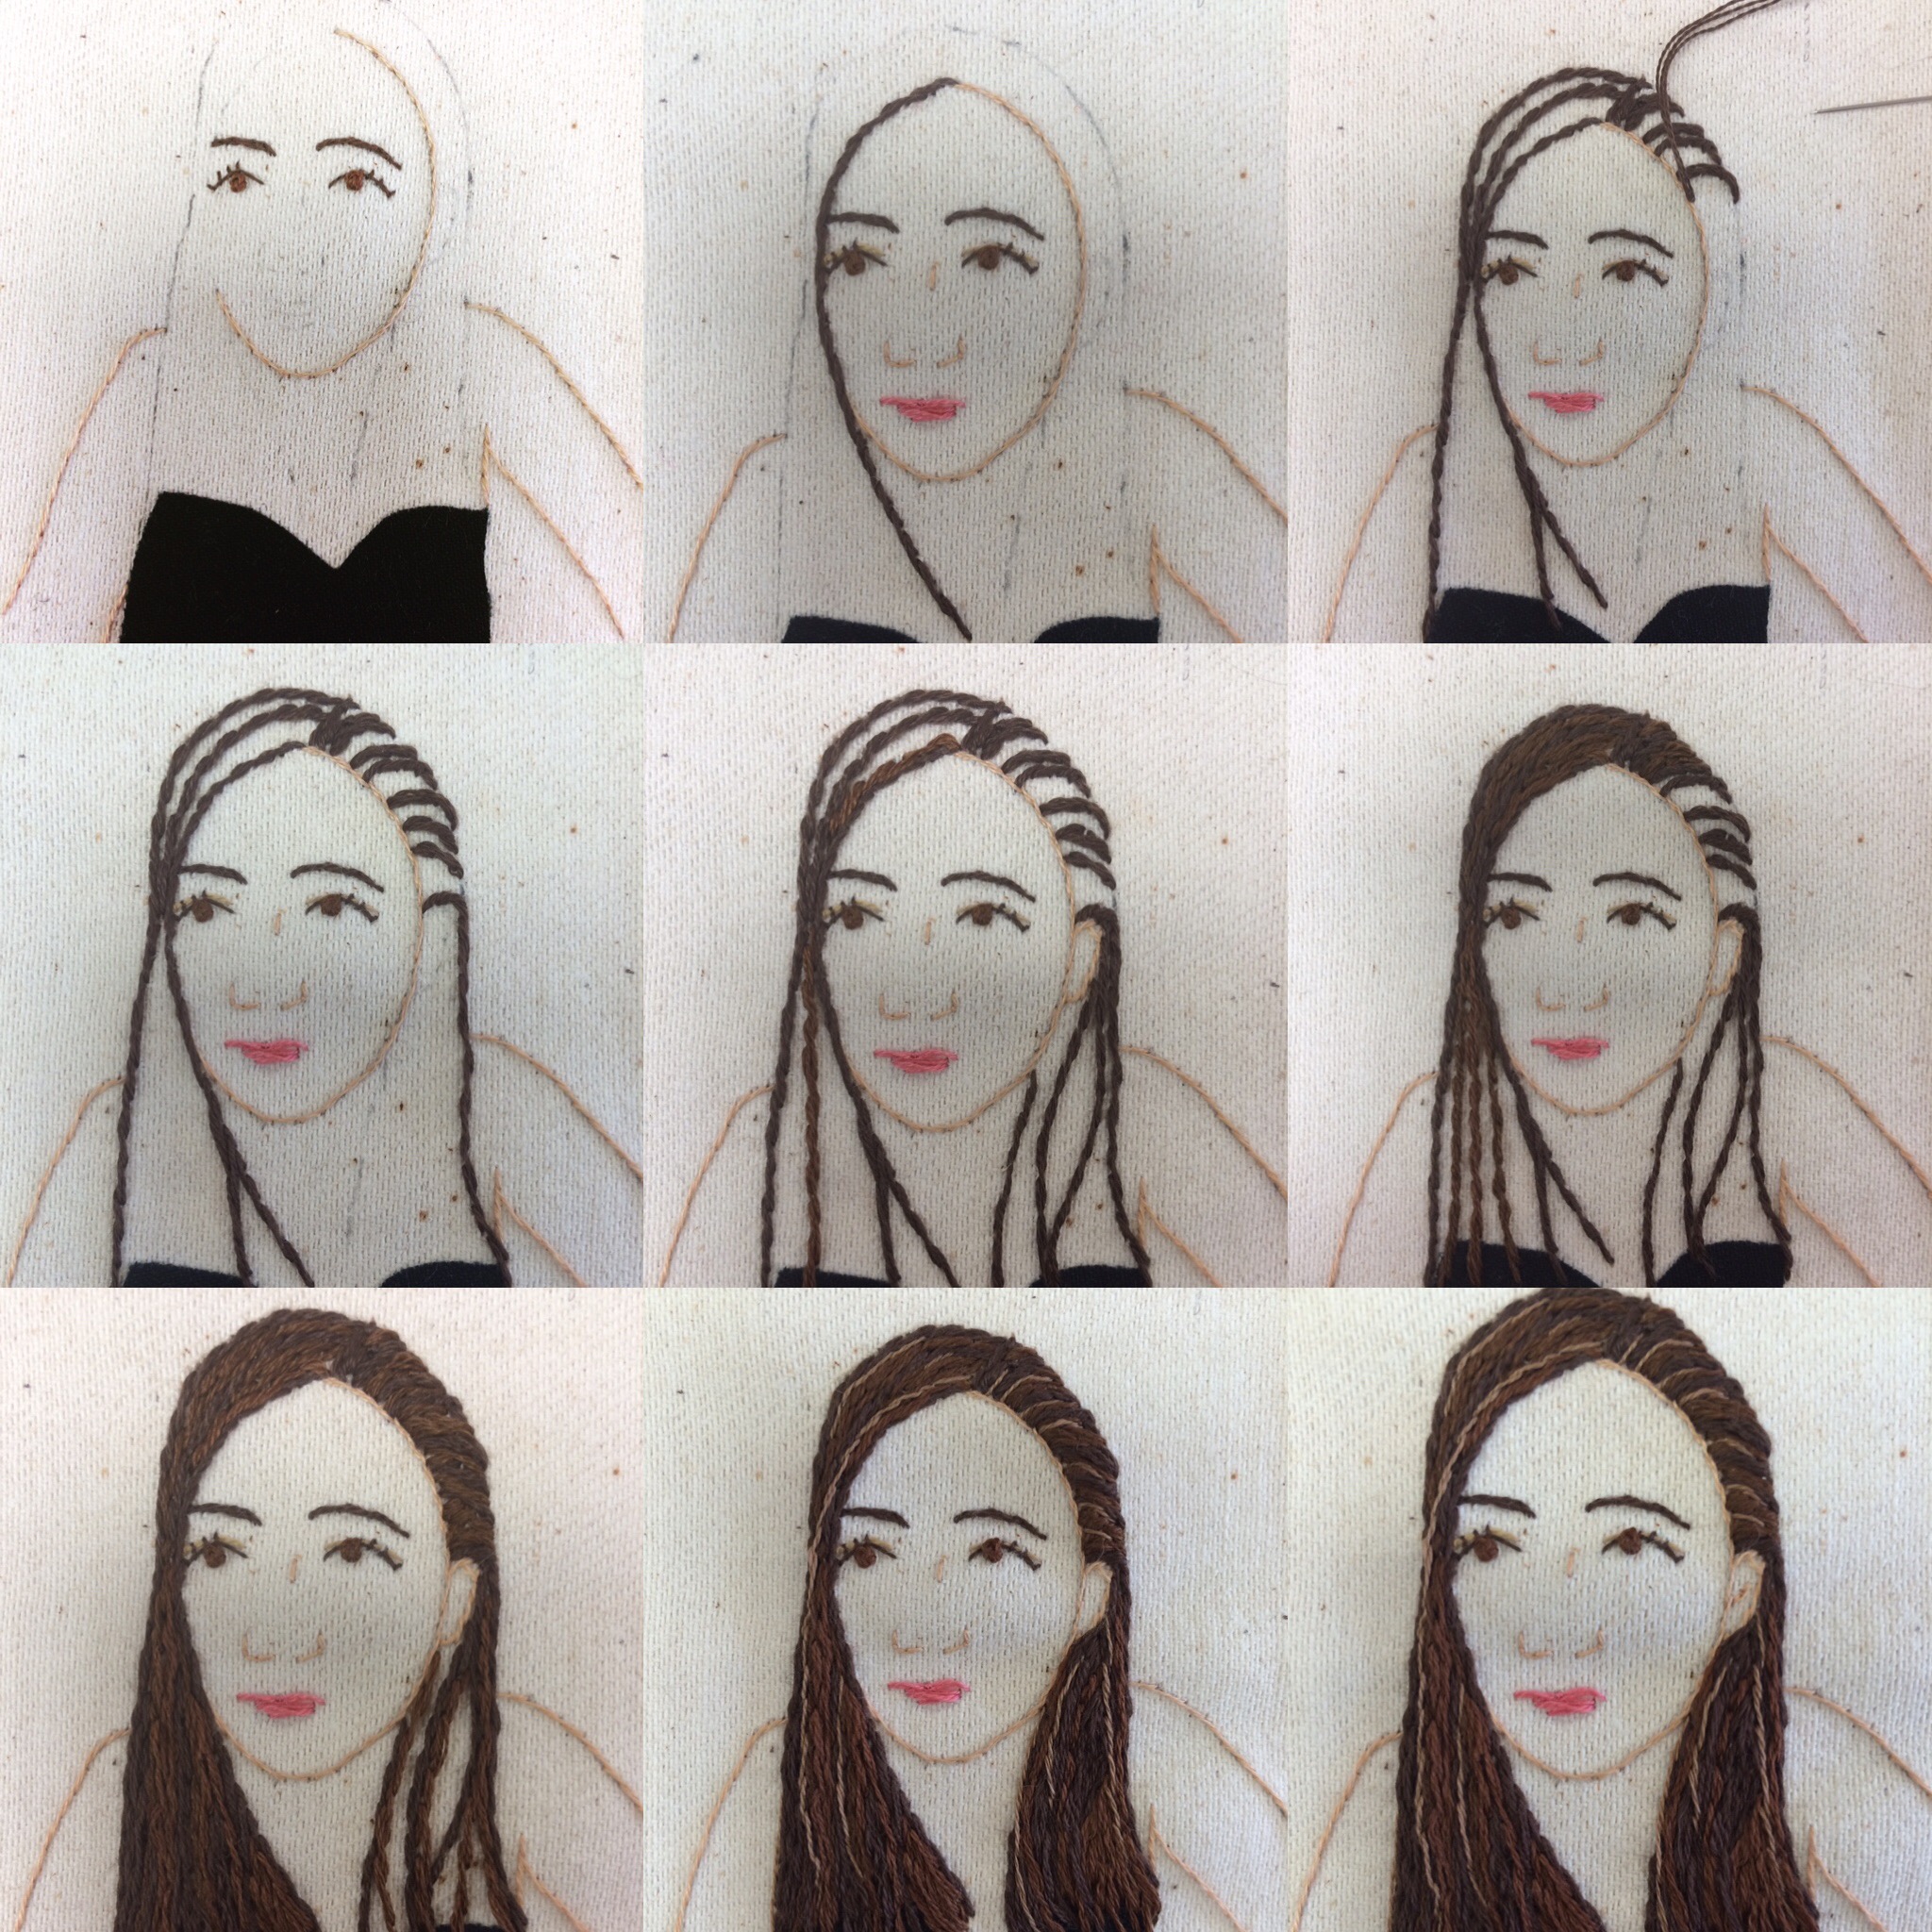
The set of the jaw, hairstyle or a strong facial feature always helps me to give the stitched portrait a true likeness. 

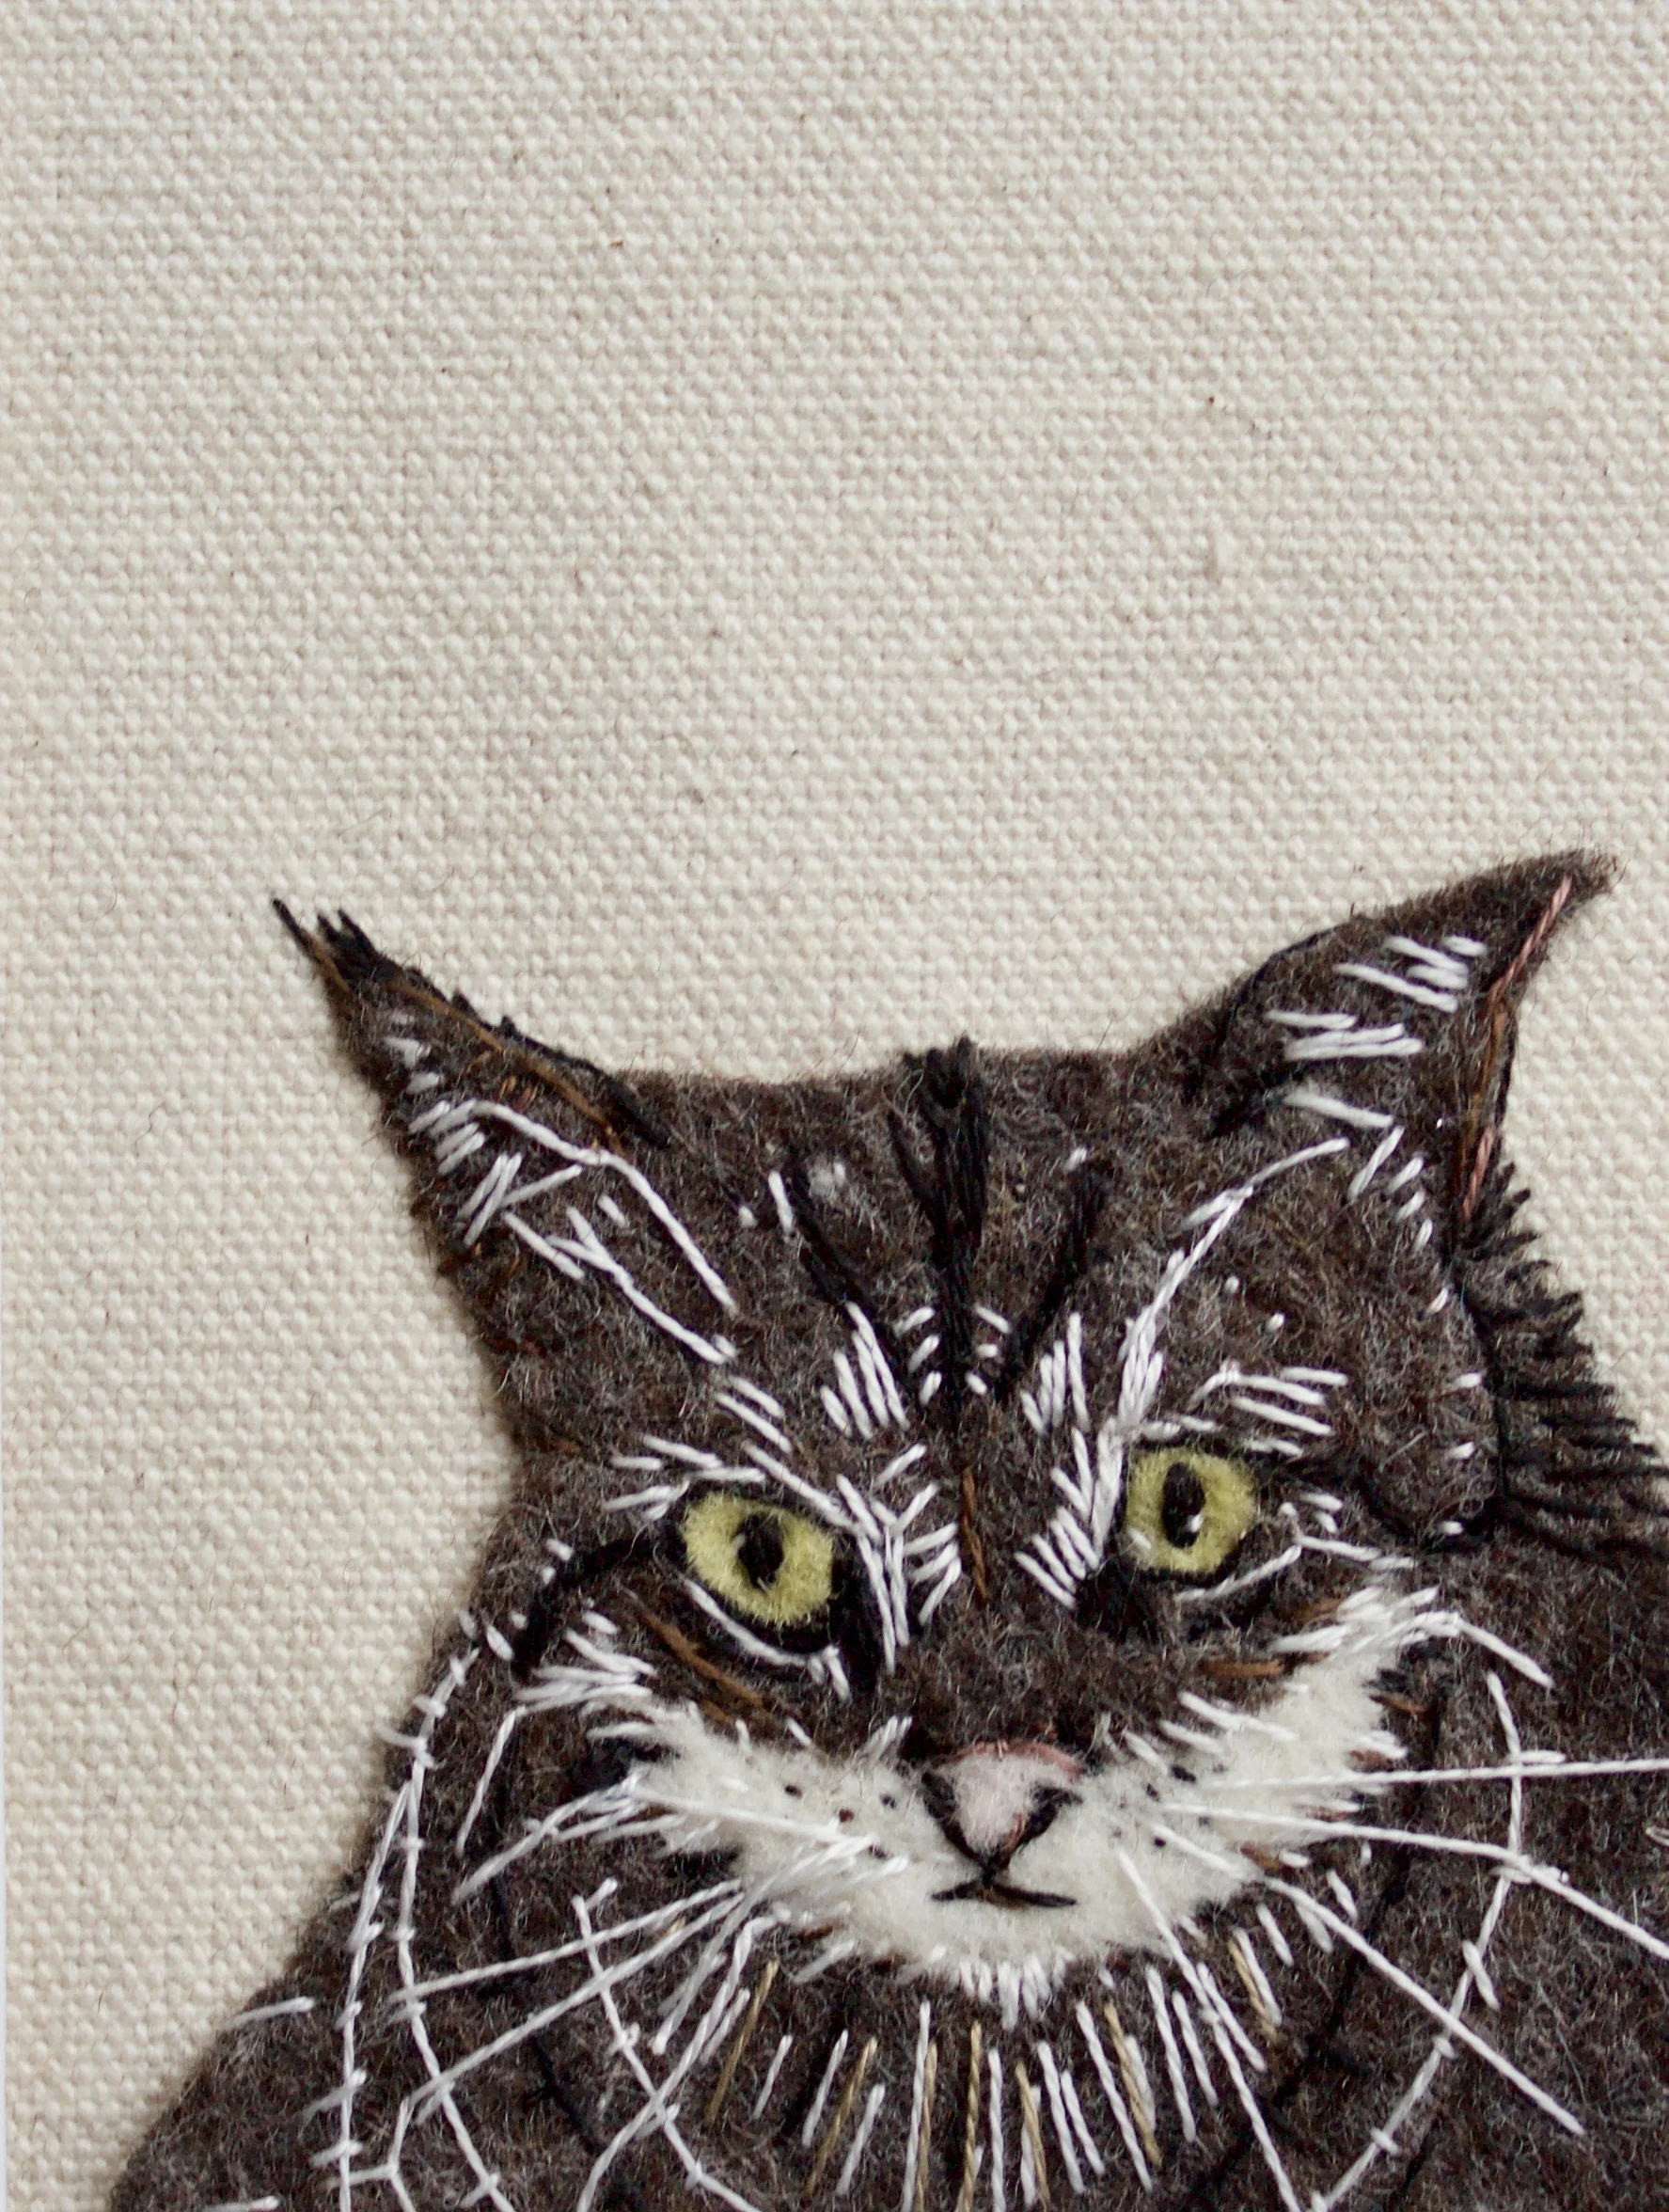
The same is true with animals - choosing the right coloured threads is important, and choosing a photo which I think will work best with stitch. Having a strong outline which shows the ears, or snout is always helpful. Sometimes, as in the horse or a dog, a side profile works best, but equally a face-on profile can be perfect, especially for cats.

My portraits take approximately 4 hours of continuous stitching although I set aside a day's work as I am very good at getting distracted - coffee needs to be made and drunk, my dog needs attention and walking and my children need food, pretty much constantly it seems. And then there's my husband.....

Each portrait costs £65, unframed. I can arrange framing for them through my local framers in Bristol - Niche Frames. http://www.nicheframes.co.uk

They can be framed individually, or, for a set of family portraits, I like to place them side by side in a long narrow frame.

I'm currently working on a new portrait which I'm going to include in the Portrait Shuffle - an exhibition of portraits organised by Through Our Hands https://www.throughourhands.co.uk to raise money for Save the Children. This portrait has to be A5 in size so, for the first time, I've used paint as a base for the hair and lips in order to help me size up..

It's still a work in progress but I'm hoping it's the start of some new exciting developments in my portrait work - getting bigger and better!

June 28, 2017 /Kate Tarling
portraits, embroidery, stitched portraits, embroidered portraits, stitch, textiles, pet portraits

landscape lampshades

May 25, 2017 by Kate Tarling

Sometimes you get an idea in your head and it comes to nothing. But occasionally an idea festers for long enough to become a reality.

Whilst I love making pieces of wall art, I really wanted to try and produce something which had a function, as well as being beautiful. I like the idea of ordinary objects being elevated into pieces of art whilst retaining their usefulness. 

I’ve been stitching maps for the last couple of years. I use freehand machine embroidery to create the lines, roads and houses and then add pieces of hand painted silk which I then overstitch to give the impression of trees.

[PRINTx3] GlozRoad.jpg

This “embroidered map movement“ started off when I made my dad a map featuring his home on the Malvern Hills in Herefordshire to celebrate his 70th birthday. That first map was quite basic in comparison with what I make now, but it produced enough of a reaction to give me the confidence to keep going and develop the idea further.

Recently I’ve been adding more colour to the canvas by applying silk paint before stitching over the top. The urban landscapes didn’t necessarily need more colour, but when I started to design the Cornish coastline map, I realised that the patchwork effect of the fields needed something behind the stitching to make them come to life. Adding silk paint isn’t easy as it’s very thin and doesn't stay where you want it to, but the colours are stunning and go so beautifully with the stitching.


However, whilst I love making pieces of wall art, I really wanted to try and produce something which had a function, as well as being beautiful. I like the idea of ordinary objects being elevated into pieces of art and so I decided to try and turn my maps into lampshades. 

It’s incredible how much material goes into producing a lampshade. It’s more than you'd think. And covering a piece of material, almost a metre long, in embroidery requires hours and hours of stitching.

My initial designs were quite simplistic. I wanted to take elements of my maps and transfer blocks of colour and lines onto the lampshades. But it didn’t work. I nearly gave up on my first attempt because it wasn’t turning out how I expected. The colours were bleeding together and it didn’t have the crisp quality I was aiming for. 

Initial design

Initial design

With a heavy heart I posted my poor progress on Instagram but received such positive and lovely comments that it gave me the encouragement I needed to carry on.

I realised that in order for it to work I needed to work into the material with a lot more embroidery and that, basically, each lampshade was going to be several days in the making, rather than hours.

I knew it would be difficult -  stitching such big pieces of fabric is a study in manipulation and requires patience and perseverance - but I was really satisfied with the finished piece. 

finished lampshade

finished lampshade


Of course things still didn’t go smoothly. The first lampshade I made upside down! (apparently a very common rookie mistake).

And then I needed to source some suitable lamp bases. After all, what use is a lampshade without a base?

I spent more hours trawling the Internet and then finally came across a wonderful woodturner on Etsy called John Bridgeman. https://www.etsy.com/uk/people/johnbridgeman

He made me these beautiful Ash conical bases which I think set off my lampshades perfectly. Thankyou John!

Happily, my lampshades are now real, and not just in my head.

You can see the finished lampshades, complete with bases, in Fig, on the Gloucester Rd in Bristol http://www.figshop.co.uk


May 25, 2017 /Kate Tarling
stitched map, embroidered map, Gloucester Road, lampshade, embroideredlampshade, landscae, freehandmachineembroidery
Privacy Policy